

Quickstart
Install rlx and go from nothing to a manager and two coders working on a goal you gave them in plain words, in about five minutes.
By the end of this page, a manager agent and two coders are working on a goal you described in your own words, each one a real session you can watch and type into. You need a terminal on macOS, Linux or WSL2, a git repo to work on, and Claude Code or Codex with an account for it.
Install
From the repo you want the agents to work on, run the one-line installer. It installs only what your machine is missing and registers that repo as your first project:
curl -fsSL https://aisquare.studio/rlx/install.sh | shPrefer to see each step, or on Windows? Install has the by-hand route with uv, the WSL2 line for PowerShell, and how to read the script before you run it.
Open rlx
The installer offers to open the UI at the end. Otherwise:
rlxrlx opens full screen on Welcome: three cards that take you from an
empty home to a running fleet. The sidebar on the left lists your projects;
the cards are on the right.
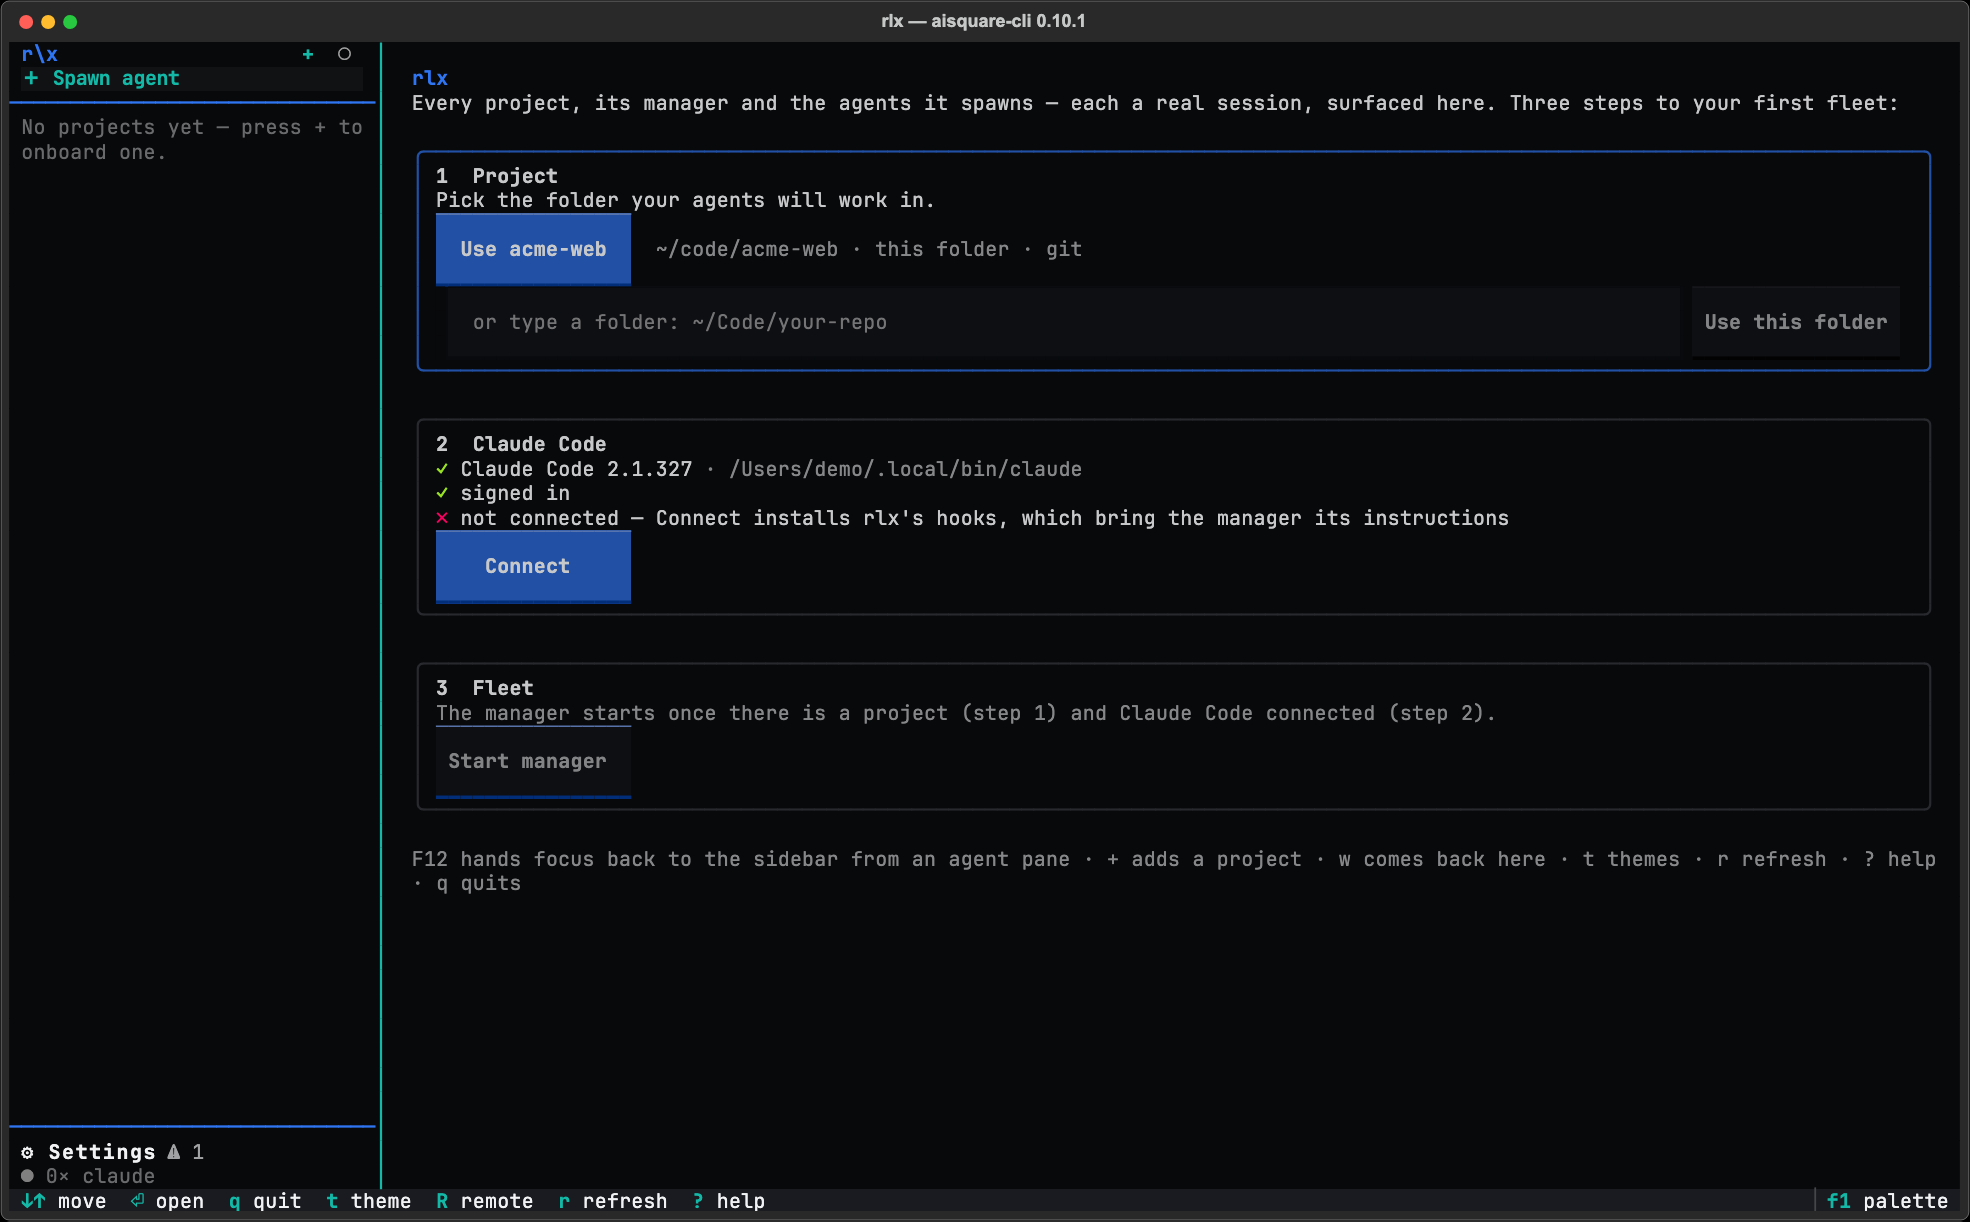
1 Project
If you started rlx in the repo the installer registered, this card is
already done. Otherwise press Use <name> for the folder you are in
(or one of your projects), or type a path and press Use this folder. Choose
another changes the pick later. A folder that is not a project yet is added
in the background: rlx registers it and runs its checks without leaving
the UI, and it appears as a card in the sidebar.
2 Coding agent: Claude Code or Codex
The card is titled with the agent the fleet runs, such as Claude Code, or
Coding agent while none is installed. The one-line installer already
connected your agent, so this card is usually done too. If it is not ✓, press
Connect. It installs rlx's hooks into the agent, which is how the manager
receives its instructions and how rlx knows what every agent is doing. If
the agent is missing, the card links its install page; it notices the install
within a few seconds, and Check again looks at once. If you are signed out, Sign in
opens the Accounts page, and once the sign-in lands rlx brings you back to
Welcome with the keyboard on the next step.
3 Fleet
- Press Start manager.
- Press Open the manager. The agent asks once whether you trust this folder: answer it in the manager's pane.
- Press
F12to hand the keyboard back to the sidebar, thenwto return to Welcome, and press Start the coders.
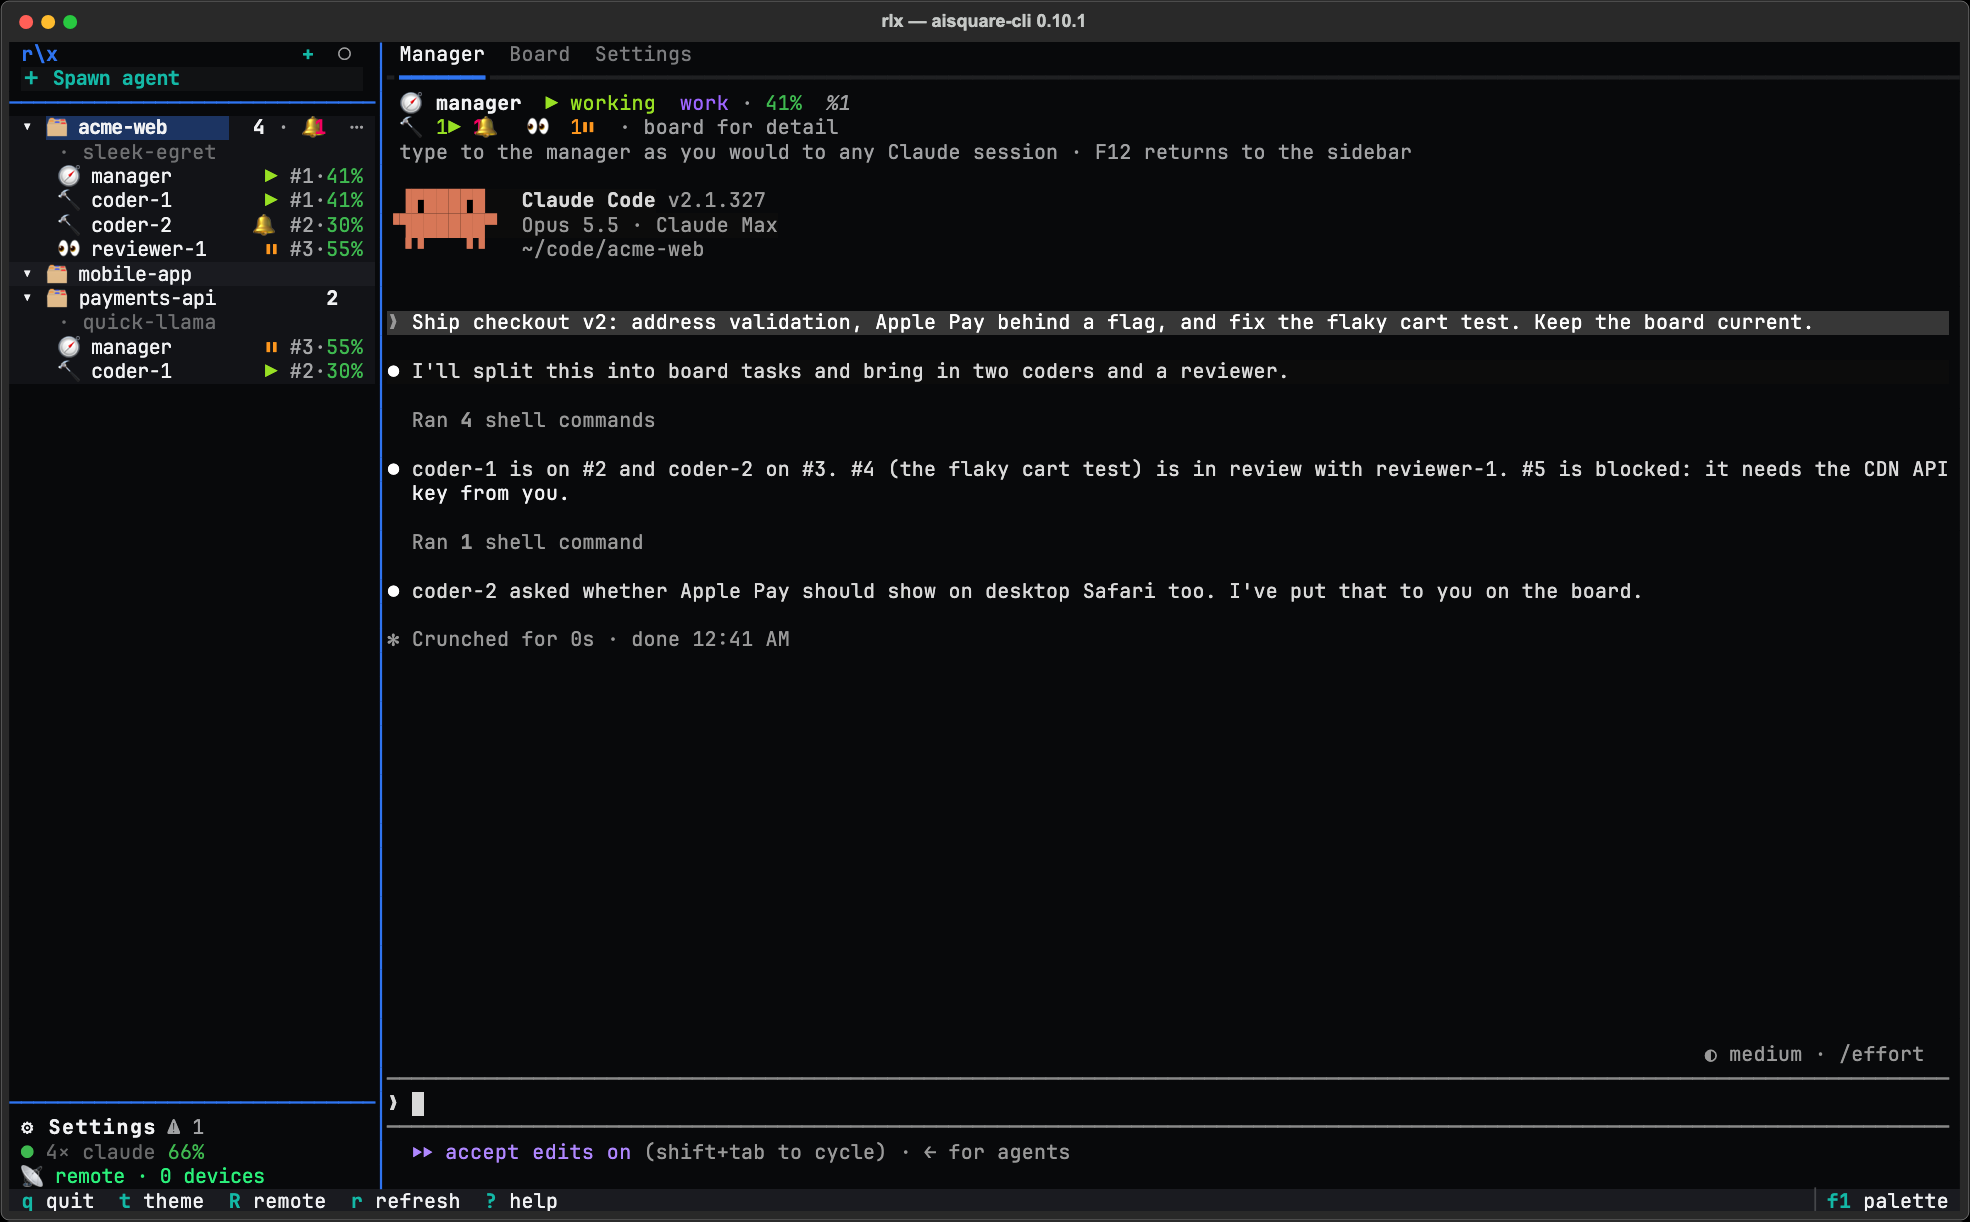
You now have a manager and two coders (coder-1 and coder-2), listed under
the project in the sidebar, each a session of its own.
Give the manager a goal
Click the manager and type what you want, in prose, the way you would brief a tech lead. Be concrete about the outcome and how you will judge it:
- "Add a
--jsonflag to theexportcommand, with tests, and document it in the README." - "Signup accepts email addresses with spaces in them. Fix the validation and add a regression test."
- "
make testfails about one run in five on CI. Find out why and make it deterministic."
What happens next
The manager plans and steers; the other agents do the work. You will see:
- Numbered tasks on the board. The manager writes your goal down as tasks
(
#1,#2, ...), each with acceptance criteria. Open the project's Board tab to watch them move. Its top line counts what needs you: waiting agents, questions, reviews and blocked work. - Coders in their own worktrees. Each coder claims a task and works in its
own git worktree on a
fleet/...branch. When the task's contract asks for it, the coder pushes and opens a pull request (with gh installed). - A review loop. The manager sends a tester to try to break each change, a ui-tester to check anything a user sees in a real browser, and a reviewer to read the pull request. A failed check reopens the task with the reason, and a coder picks it up again.
- A clear finish. When everything passes, the manager posts
READY:with the pull requests and the evidence.
The manager never writes code and never merges. Reviewing and merging stay with you.
Each agent in the sidebar carries a state icon: ▶ working, ⏸
waiting, 🔔 when it needs you (with a terminal bell), or ⏳ when it is
parked on a Claude usage limit. The board and rlx fleet ls spell the
same states out, such as 🔔 NEEDS YOU. On the project's Manager tab, a line under the
manager's info line counts the agents it runs by role and state; click it to
open the Board.
Pick the model once
Type /model or /effort in any fleet agent's pane as you would in Claude
Code. rlx remembers your last pick, and agents spawned after it start on
that model and effort unless a role's own settings say otherwise. With no
pick, Claude Code runs the account's own default. See
Run a fleet.
Moving around
- Click an agent and its pane has the keyboard: everything you type goes
straight to its Claude Code session. A screenshot you drop onto
rlxgoes to the agent on screen. F12hands the keyboard back to the sidebar. It is the one key a pane never forwards.- From the sidebar,
wreturns to Welcome,?lists every key, andqquitsrlx. - The agents keep running after you quit. Open
rlxagain and it re-attaches to them.rlx fleet attachshows the same sessions in raw tmux from any terminal.
Once a project is set up, rlx asks you once whether to share anonymous usage
counts with AISquare. It is off unless you say yes; see
See where your usage goes
for what would be sent.
Add a second Claude account now
A busy fleet can use up one account's five-hour window quickly. Open ⚙ Settings ▸ Accounts, press + Add Claude account, and sign in. From then on, new agents start on an account with room, and an agent that hits its limit moves to another account and resumes its own session. See Connect more than one Claude account.
Memory only, no fleet
If you want your Claude Code sessions to remember your preferences and each project's conventions, without running a fleet, you need only uv and Claude Code: no installer, no tmux.
UV_PYTHON_DOWNLOADS=automatic uv tool install --python 3.13 aisquare-cli
cd path/to/your/repo
rlx init --local --agent claude-code
rlx remember --user "prefer pytest over unittest"
init registers the repo and wires Claude Code's hooks, so every new session
starts with what you told it to remember. rlx context list shows what is
in scope. See Memory for the rest.
Next steps
Tour of rlx
The sidebar, agent panes, Settings and the keys you will use every day.
Run a fleet
The roles, spawning your own agents, and every default you can change.
Connect more than one Claude account
Several Claude accounts, one pool, and agents that move when one runs out.
The board
Numbered tasks, claims and the review loop, live.
Install
Install rlx with one line on macOS, Linux or WSL2, pin a release with its own installer, or install by hand with uv. Check the machine with rlx doctor, update from rlx in one click, and remove it cleanly.
Tour of rlx
A guided tour of rlx for daily use. Projects and agents in the sidebar, agent panes that are the real sessions, a project's tabs, the Settings hub and its status line, and the keys worth knowing.